Game Projects
Game Projects
Lumberyard projects act as the folder repository for all files involved with the project. The Project Configurator considers each folder a “Game Gem”. A project can be associated with multiple Gems, and each Gem can add/remove functionality and ease scripting interfaces. To switch between projects, the Editor must be closed and the Project Configurator open, where you can enable/disable gems and switch projects by setting it as the default. When a project is created, the folder can be found under the “dev” directory of the Lumberyard installation. Transferring a project requires all its associated gems to be transferred with it. Enabling/disabling gems also requires a reconfiguration and rebuild of the game.
Project Hierarchy
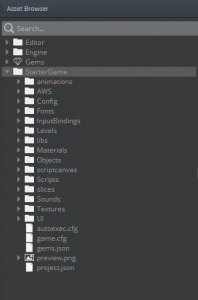
While there is no mandated hierarchy that needs to be followed for user-imported assets, there is a vaguely defined structure, exemplified below with the folder structure of a sample project that comes with Lumberyard. Exceptions to this rule are the audio files and folders. The Wwise project, sound banks, and the XML files for the audio that needs to be imported into the game currently have hard-coded paths in the engine. Lumberyard only looks for audio files to be present at certain locations, ignoring any other user-defined location.
Game Levels
Every new level in a game project is stored in its own directory under the main project directory. Level directories contain information about the terrain, time of day, and where all the entities in the level are placed. You can also enable automatic backups in your project, the cache for which is stored inside the level directories. Levels are directly associated with a project, and when browsing for opening a level, developers are restricted to the levels within the project, and the developer can’t browse outside the project folder.
Slices
Slices in Lumberyard refer to saving level entities (and their components) as a separate file of data to be reused in the same or a different level. Saving an entity as a slice includes saving the children of the entity and their relative transforms, so the object can be duplicated multiple times. Modifying attributes of an entity in a slice can be then saved to the slice file, which will propagate the changes to all the other entities which are instances of that slice. It is good practice to save objects which are replicas of one another as a slice, because it makes adding/removing to all those objects easier in the future. Lumberyard allows for nested slices, meaning, children of a slice entity can also be slices themselves. This multi-layered slicing is useful in cases of modifying specific entities within a slice. Another benefit to slices are that they can be edited and saved without saving the level, which allows for collaboration on the same level without worrying about conflicting one another’s work.
Multi-layered slices, however, have a shortcoming of that the child slices become detached, acting as an independent instance. This meant that each child could not be independently modified, and would require the modification of the parent slice. This might cause some problems while collaborating, and so a workaround is to keep the slices detached, especially if they need to be edited simultaneously. Another issue we encountered with slices, which may not directly be the result of slices but rather caching/perforce, was slices not being shared properly. The work-around is generally having users with an inconsistent copy of the slice replace it with itself (almost acting like a “refresh”).
Resources
Creating Builds
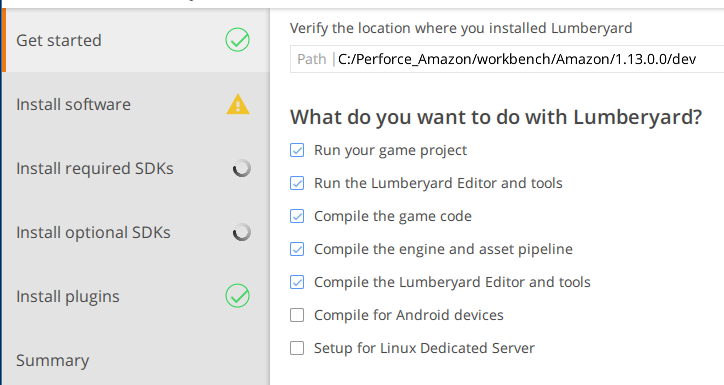
To be able to create a build of a project, the computer needs to be able to compile the Lumberyard engine which requires the Setup Assistant to have the first 5 options selected in the Get Started tab. In addition to these options, there will be additional required 3rd party libraries and SDKs to install once those options have been selected.
There is a 5 step process, each with sub-steps, for a successful build to be made. It is recommended to create a project pak and shader pak batch files specific to the project by duplicating the already available files for samples project and changing the project name. Within those files, to see errors/success after running the file add a pause after the echo for fail or success, otherwise the command window opened by the batch file will close on complete (regardless of process outcome). To create a smaller build, the project named files in the Bin64vcXXX.Release that aren’t the project being built can be deleted. There may be a way to minimize the build more, however be careful of what is deleted because it may corrupt the project build. The documentation doesn’t mention the step to export the level to the build, prior to running the project batch file; in the level editor, in the games tab, the level must be exported to the engine. If the level isn’t exported, when the build is run the level will be empty, without entities; the level will still have the level properties like terrain and time of day. Another pinch point can be with the time of day settings, since running the game in the editor doesn’t simulate the time of day where a build does. See the Environment section for a more detailed solution, but the simple fix is ensuring the current time is within the start and end times. Finally, once a build is created it may not run at full-screen or the correct resolution for the application being deployed to; to change this for all future builds modify the system_PLATFORM.cfg file to have the correct r_width, r_height, and for full-screen set r_fullscreen to 1. To modify an already created build or so future builds don’t carry the same settings, there is an associated system_PLATFORM.cfg file located in the build folder that can be changed.
As a demonstration for the build files, the Workbench Project build files as well as a readme are bundled into a zip, BuildProject. An additional file was created, named BuildWorkbenchProject, to help complete the steps outlined within the Amazon documentation; use the readme to edit the files for a different project.