IF
Interactive Fashion
 
IF

Blogs

Week 1:

In week 1, we first time met as a group with our faculty mentors and clients. We chose IF as our project name since it has the meaning of unlimited possibilities and  works as the abbreviation of interactive fashion. We also planed out our daily schedule and weekly meeting time with faculty and clients.  By the end of week 1, our first version of logo came out (Designed by I-Tang).

Week 2:

In week 2, we interviewed with the middle school students during their after school program at MuseumLab. We got some insights about what kinds of technology they would like to interact with during this upcoming fashion exhibition. We also gathered some information about how the other projects formed in the museum and how should we use the space. We came out three ideas to try to meet our client's expectations and merged two of them after we shared them with our client.

In this week, we also started on building our website, revising the logo, and brainstorming our poster and flyer.

Week 3:

In week 3, we had our Logo finished and ready for publishing to ETC's website. We received the materials we ordered for prototyping and started to play with them to see whether they meet our expectations. We made a playable prototype of using the distance sensor to change the LEDs. We presented three concepts that are built on the feedback from Week 2's meeting to our clients. We made decision on the concept with our client and faculty and prepared well for our quarter presentation in week 4.

Week 4:

We have created our team photo and poster. Aside from the team-building tasks, this week is a milestone for us. We had our quarter presentation that we had to elaborate on our innovative ideas and the project direction to faculty and instructors. Comments and feedback from our faculty and clients helped us to understand the insufficiency of our concepts. Therefore, we kept iterating our ideas to try to convert it to a deeper and more concrete concept. This process is not easy for us due to the restrictions of implementation caused by the size and brightness of the space. We worked on further constructing our ideas and exploring the possibilities in order to overcome the difficulty.

For the next week, we will keep working on building prototypes  and take them as step stones to explore a further possibility.

Week 5:

In this week, we revised our idea based on the comments from both the faculty and client along with carefully considering the constrains we have of making this project. We thought about the important elements that we should keep in mind when developing the idea:

  1. Multiplayer
  2. No separated space or dark room
  3. Robustness
  4. Reasonable interactions
  5. Fashion
  6. Inspirational as a museum piece

By considering these elements, we came up with a pretty concrete idea of how do we design the setting. We through about using a 360 degree display desk to allow more thru-put and adding projection mapping into the wearable technology to increase the interactivity and flexibility of the patterns.

In order to further settle down our idea, we went over to the Children's Museum to have the after school program's students fill out some questionnaire for us. We researched about the patterns that commonly seen on junior's fashion design and gave options to them to pick from. This research process presented us really useful information about what kinds of story that we should build into the piece in order to resonate with our targeted audience.

Also, we had the opportunities to talk to some experts in costume design and stage design. We met with Olivia Robinson, who works as an faulty of both ETC and IDeATe. We got inspirations about designing our wearable technology to be able to display the creativity of each individual, such as allowing children to create their own patterns and having each pattern to interact with other patterns. We also had the chance to meet with Hedy, who was introduced to us through Ralph Vituccio. She showed us the ways of doing projection mapping on cloth and introduced us some special materials that she used in building her wearable technology on stage.


Week 6:

We revised and finally settled the idea based on our client's comments in this week. We planed out the scrum board for one and a half week so we can present both prototype in Unity and the physical prototype in half presentation. 

Scrum Board:

  • Pattern Design
    • Pattern Design Version 1
    • Pattern Design Version 2
  • Unity Prototypes
    • Playable Prototype in Unity
    • Refined Prototype in Unity
  • LED Boards
    • Demo of using color sensor
    • Demo of using color sensor to change RGB color
    • Demo of change pattern by sliding zipper
    • Demo of using LED matrices

Also, in this week, we met with a group of middle school students in the ETC. We presented our prototype and gathering the pixel art ideas from them by handing out some 10*10 grids for them to fill color in. We developed patterns based on their sketches and added into our Unity prototypes. We also started the process of programming LED light boards in order to show these patterns.

Week 7 & 8:

In this week, we focused on preparing for the 1/2 presentation in week 8. We had developed versions of color sensors and distance sensor and playtested the prototypes for iterations.

Our feedback from the playtest are:

  1. Making the distance sensor more accurate with better content
  2. Having one color to stay longer after being detected
  3. Changing the UI of color sensor
  4. Changing the UI of the distance sensor
  5. Making a better color sensor holder
  6. Having more objects that can be detected on the table
  7. Allowing the color sensor to detect black/gray color
  8. Making the patterns move
  9. Having the color changing happens faster
  10. Having two or more color to be detected at the same time

According to the comments from the playtests, we refined our design and ready for the next round of playtest in week 8.

In this week, we also finalized our design by settling down by layout of our exhibition and the outfits that we are going to put on the mannequins.

Week 9:

Starting this week, we move to remote due to the COVID-19. We used this week to prepare ourself for working independently from home. We settled with the list of item that we need to purchase and decided the way we organizing our meeting and presenting the daily tasks. We also met with our clients and faculty instructors to discuss the future expectation about the project.

We decided to use Google Sheet to update our daily tasks:

Week 10:

In this week, we separated into two groups, one is in charged of refining the technical parts and delivering a build for the playtest day, and one is working on the documentation and will be hand out template to the technical people to fill in more information. Working remotely is hard and we are using a google sheet to track our daily tasks. We are also following the meeting schedule we have and having two meetings per week to keep our instructors and clients on track.

Week 11:

In this week, we parepared for the official playtest day and worked on inventing people to join us on 4/6-4/8. We reached out to a middle school teacher who works closely with children of age 10-14. She offered us a special class so we can meet with her students remotely. In this case, we will be able to playtest with large number of people pf our targeted demographic.

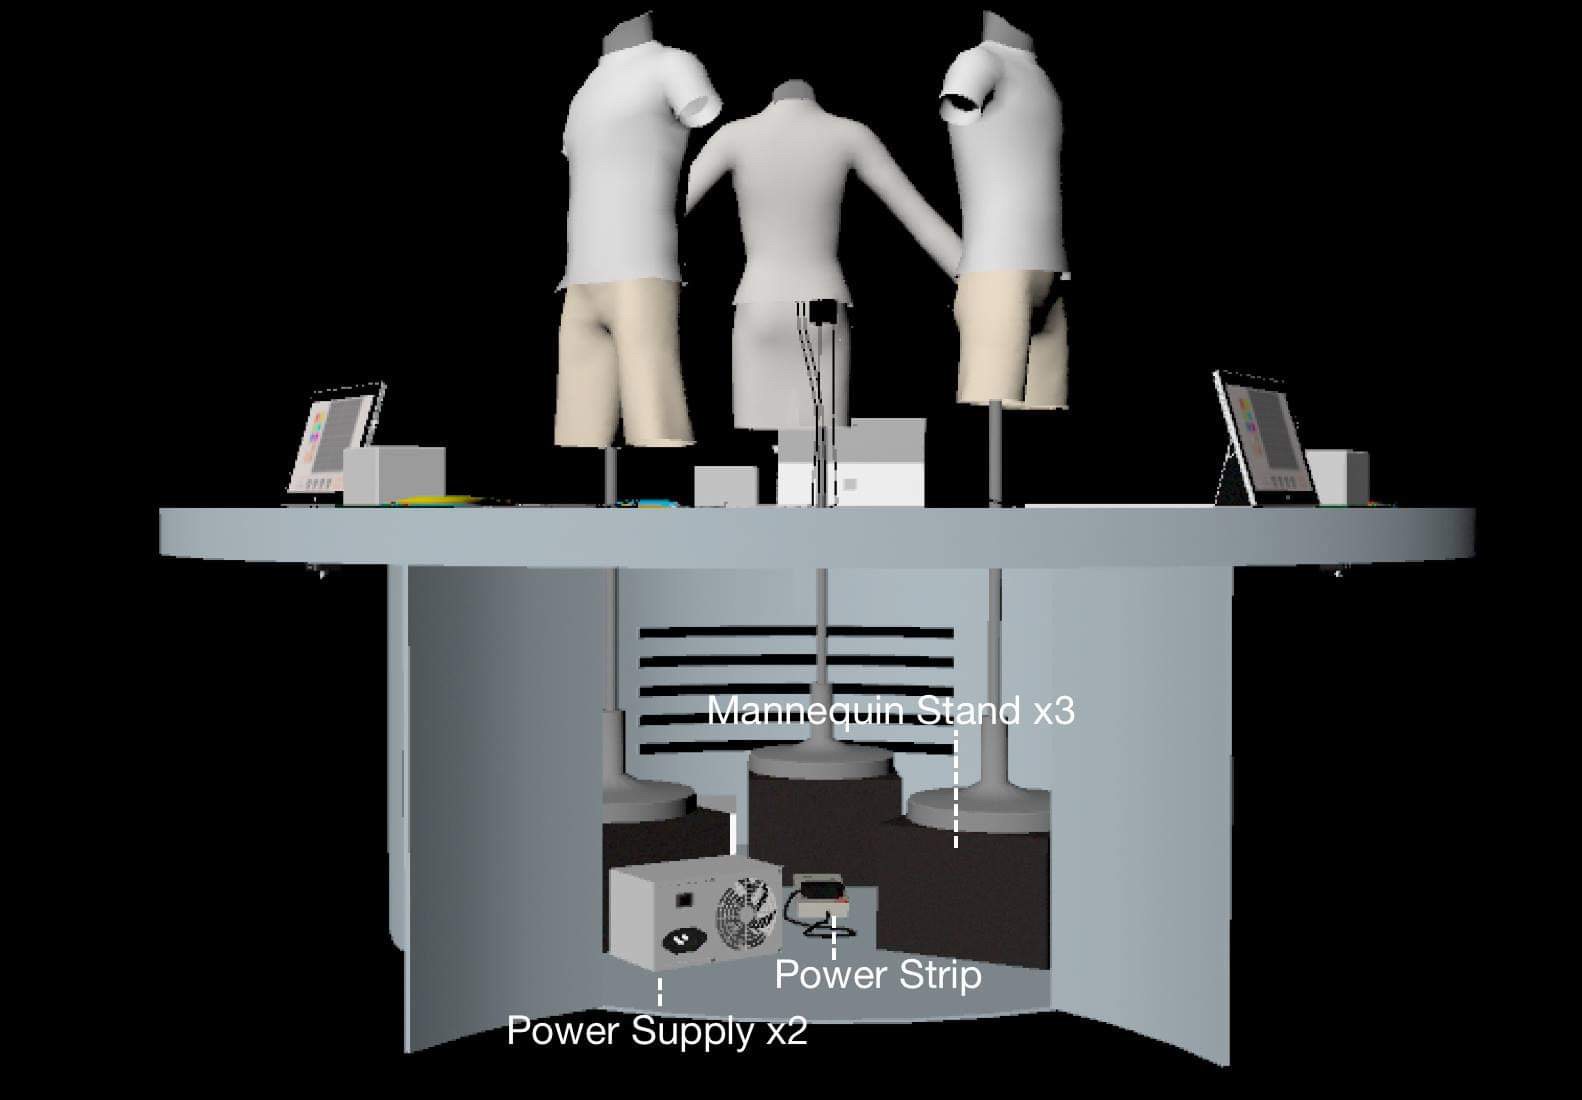
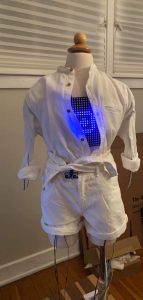
Also, we have finished combining each part of the exhibition and successfully moved all the sensors, wires, and LEDs to the new mannequin. We revised the table design by considered the wheelchair accessibility. We finished the documentation and ready for adding the specific codes into it for Museum staff to install the final exhibition.

Week 12:

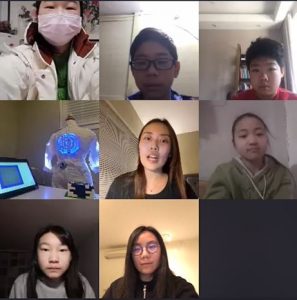
In this week, we playtested with a lot of people including our target demographic, alumni, faculty, and museum staffs. We held streaming playtest sessions through Zoom and allowed people to join us by simply clicking into the Zoom link.

Our playtests result was carefully recorded by us and was organized into a list of things that we need to revise by soft opening. Thoes included the improvement of the distance sensor, adding two more features to the editor, and designing the newer version of UI based on the new features.

Week 13:

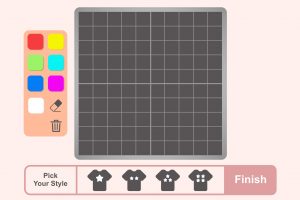
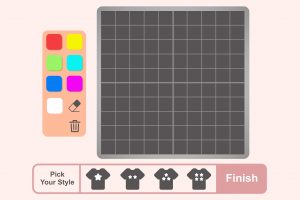
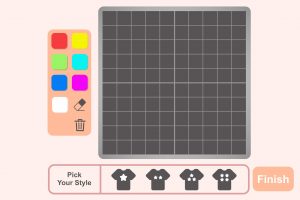
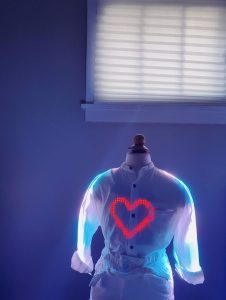
In this week, we revised the design based on the conclusion from the previous weeks. We added the feature of changing LEDs' pattern on its shoulder while detecting a new color through the color sensor. In addition, we also add the feature of choosing the pattern layout on the editor. It allows the user to choose the design of the pattern they want after they finish drawing.

We are approaching the end of the semester. We have started to create the final ppt and prepared for soft opening next week. We will have the final round of revision next week according to the faculty's feedback in soft opening and start to fill in the information to the documentation. We will finalize the website and turn in a 1000 words report by next Friday.


Week 14:

This week, we had our soft opening on Monday. We used zoom to present our current progress to the faculty and received feedback on how to do certain final changes and how to present them in the final presentation.

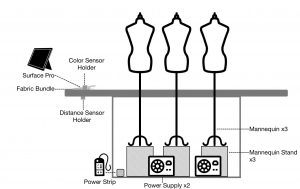
  1. Will kids write bad words on your editor and have it shows on the mannequins? How will you solve this problem? 

Answer: we have a refresh mechanism that refreshes the canvas once you leave the table, and 10*10 grids are not able to write words of more than 3 letters due to the resolution, so that kind of limits the ability to write any bad words. 

Follow up question (Heather): Does that mean you limit their creativity? 

Answer: The 8 color painting brush gives them the basic colors that they can use to draw a picture, they are the colors that present better results after testing; Also, allowing them to choose the pattern layout is kind of similar to how fashion design really works. 


  1. Why don't you use sound in the project? 

Answer: it will be a huge pain to the facilitators according to our client's experience with the interaction exhibition. So we did not add sound to the project. 


  1. Why not having a hat, shoes, and other accessories?

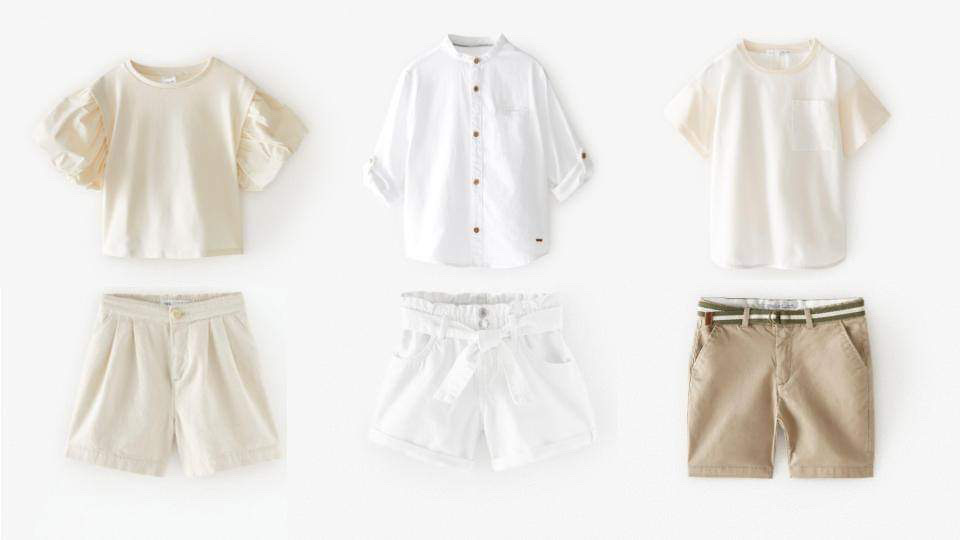
Answer: The reason we changed from mannequins to dress forms was that they don't want any heads, arms, and legs that can be taken apart from the body. They are afraid that children will take off their heads and throw at each other. In addition, our client wants to pursue the feeling of fashion designing instead of demonstrating clothes. So having dress forms with no heads and arms gives a more professional feeling.


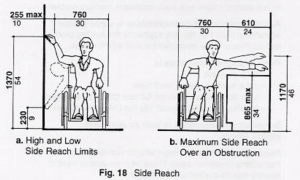
  1. Make sure to address the measurements of your table design

Answer: yes we designed it based on our research about the average arm length of 10-14 years old. We use that to prevent children from touching the mannequin. 


  1. What do the other two mannequins look like?

Answer: we have used the same color of clothing for all three mannequins so that the LEDs look more clear underneath it. But they are in different styles so we present the variety. 


Team IF Post-Mortems Report :

Introduction and overview of the project: 

In this semester, ETC Team IF is partnering with the Children’s Museum of Pittsburgh to create an interactive and e-textile experience about fashion for middle school children. Our goal is to provide visitors of age 10-14 the opportunity to play with wearable technologies that trigger communication between sounds when they interact with each other or with the environment. As a deliverable project, we will build one set of installation and Handoff the guide and documentation for physical installation and technical support.

In the past 14 weeks, we have used our knowledge and talents of researching, designing, prototyping, programming, and fabricating to all steps of experience development to emphasize edutainment, engagement, and interactivity. Our team members are Aubrey Chuhan Wu, who is the project producer and UX designer; Xinxiu Zhong, the UX designer; Amelia Xi Li, who is the creative technologist; Leo Ting-Sheng Lin, the software and hardware programmer; I-Tung Chiang, the software and hardware programmer. 

The interactive fashion exhibition will be held during summer 2020 in the Museum Lab of Children's Museum of Pittsburgh. As a location-based entertainment experience, IF relies on Arduino and its output devices to offer feedback through the changes of LEDs’ color to its users. This project contains three interactions that promote the learning of wearable technology and the inspiration of handing on the fashion design processes. The three interactions are “welcome zone”, customizing patterns, and the “real-world color picker”. 

“Welcome zone” indicates the start of the experience and gives a warm welcome to the guests. It relies on the distance sensors that are used to detect the distance between the visitors and the mannequins to affect the brightness and the patterns that are demonstrated by the LED boards. Once the guest approaches the table, he/she may use the Unity Editor, which is the customization feature, to draw the pixel art with a touchpad and to send the patterns with the layout style that they like to the LED Boards through Arduino. Later on, the guest may make further changes to the design by grabbing whatever they want to be detected by the color sensor. 


What went well:

This project accomplishes the idea of allowing kids to communicate with each other during the process of exploring wearable technology and being inspired and educated by designing the outlook of the clothes and collecting a variety of colors. We successfully followed our project matrix, which are documentation/archive, playtesting, and client requirements. 

We have started to prepare the documentation before the half presentation due to the real experience of people’s learning from the previous installation project groups of ETC. We researched and talked to groups who had a similar mission and client with us in the ETC and made sure that we prepared early enough for the final deliverable product. We organized all the archives very well throughout the semester by using google drive. We separated files into categories to promote easy access to not only our team members but also our faculty and client. To create clear and helpful documentation to help our client’s final installation in summer, we went very detailed into the design of all components of this project including the 3D models and measurements of the exhibition layout, diagrams of wiring and fabricating, ways of troubleshooting on software and hardware, etc. By preparing all the archives and the documentation, we also gained a clear thought about the structure of this project and how each member collaborated in the process. 

In the latter half of the semester, moving to remote working brought us a huge challenge of continually developing a location-based installation, especially the playtest part. We felt very proud of what we did about playtesting and iterating after the WFH order. As a group, we reached out to people separately to seek for playtesters of our targeted demographic and successfully gathered sufficient resources to join us for playtests. We had 5 groups of playtesters outside of the ETC, which are more than 40 people in total, joined us during playtest days. We used Zoom to hold streaming playtests to allow them to join at any time without considering the timezone and location differences. We prepared very well for playtesting days and shot a demo video for people who are not able to join us through Zoom and for posting on our website and social media for more feedback (agreed by clients and we are not an NDA project). We did very well in gathering the feedback and doing iteration right away after the playtests. In this case, we made changes to our project the week after the playtest days so that we caught up on time for the soft opening. 

As a client-based project, we fulfilled our client’s requirements and tried our best to save the energy and budget for them. We revised versions of the design to try to achieve the best result and converted the cons into pros. By understanding the intention of them creating this exhibition, we adjusted our approach to promoting a better learning experience for middle schoolers through exploration and interaction. We held regular client meetings weekly and made sure to communicate and to update our progress and decisions with them immediately when needed. We created a google doc folder to our client to check on our progress and to review our meeting information whenever they need it. We had a very good relationship with our client and both felt satisfied by collaborating this semester. 


What could have been better: 

 In this semester, we also found out the challenging parts of doing an installation project. We had a hard time figuring out what to buy and when to buy at the early stages. We are not so confident with our judgment about the hardware when it comes to ordering new materials. In this situation, we ordered some sensors that end up not using them anymore after testing and talking to our client. We should get more familiar with all the sensors and tools before we purchase them such as talking to the experts of the field earlier. 

Besides, we need to improve our frequency of doing playtests in the first half of the semester. We waited until a big improvement had been made to organize a round of playtesting. However, having more frequent playtests gave us a better sense of how we were doing during the developing process. In this case, we changed from the old mode to the new mode of doing playtest after half presentation and got more frequent playtests on small changes. 


Lessons learned and conclusion: 

In this project, we learned three important things that will benefit us in future academic projects and our career path. First, there is no need to be afraid of trying new things or tools that we never used before. ETC projects provide us the best way of learning, which is putting our hands-on things and learning from practicing. Also, our faculty are always there whenever we need to talk to them, so we need to learn from asking more questions, seeking more help, and sharing more options. Second, we learned to be very serious with all the requirements that we were given. To meet our project matrix, we took our client’s requirements very seriously. At the same time, we were also making sure that we promote our learning by fulfilling our instructor's requirements. We learned how to balance ourselves when requirements conflict with each other and think creatively to figure out the way to solve the problems. Third, we also learned to be proud of each small progress we’ve made, so that we feel free to show people our progress and gather more feedback. We cheered for every small progress we’ve made and celebrated when team members learned something new. 

We thanked the people who helped us during this learning and developing process. We are more prepared for getting in touch with the real business, fulfilling the needs, and demonstrating our abilities by working on this client-based project.