MAKING THE ANIMATIONS SMOOTHER:
For making the animations smoother the animations went through four iterations. Please refer to the link: https://www.etc.cmu.edu/projects/miracle-workshop-2/index.php/2018/09/21/week-4/ to learn about the four iterations. After going through multiple tests we determined that certain speeds and accelerations make the animations looked smoother and made Tom look realistic by representing certain character traits. We first made the animations smoother in Maya using different range of motion, speeds and accelerations. After blocking the animation we then use the graph editor to make the curves smoother and the shape of the curves should be either C or S. A detailed description of how we used the graph editor and the different range of motion and speeds can be found below.
After converting the animations from Maya using the process described above for the 3D converter given to us by Weigl Control we made the animations further smoother by using some in-built features from the show controller software. Sometimes the data also had to be cleaned up in the show controller software to avoid any jerks. The process using the Conductor Pro software is described in detail after the process through Maya and the Ideal Range of motions and times.
RANGE OF MOTIONS AND TIME FOR ANIMATING IN MAYA:
We performed certain tests on the animatronic to determine a set of safe speeds and accelerations to be used for Tom’s animations which are specified as follows.
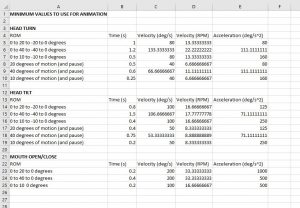
During the 2nd semester we also conducted multiple tests to make the animations smoother and used different frame rates like 30 frames/second, 45 frames/second and 60 frames/second. However after conducting multiple tests of different animation iterations we decided the ideal frame rate was 24 frames /second. But if future teams would like to use a different frame rate then the ideal would 30 frames/second.
NOTE :- Please don’t use 45 frames/second and 60 frames/second as it made the animations look more robotic and jerky as the software got confused with the data.
For animating Tom any of the above-mentioned speeds can be used. Some examples of the range of motion used is given below :
| FUNCTION | FRAME RANGE(In frames and 1 second= 24 frames) | ANGLE OF ROTATION (In degrees) |
| MOUTH OPEN/CLOSE | 1-3 | 20 |
| 1-2 | 15 | |
| 1-5 | 40 | |
| 1-6 | 40 | |
| HEAD TURN FUNCTION | 1-20 | 90 |
| 1-27 | 90 | |
| 1-25 | 70 | |
| 1-20 | 60 | |
| 1-14 | 40 | |
| 1-16 | 45 | |
| HEAD TILT FUNCTION | 1-30 | 80 |
| 1-24 | 75 | |
| 1-20 | 65 | |
| 1-12 | 25 | |
| TORSO(Initial position at 55) | 1-30 | 85 |
| 1-36 | 85 | |
| 1-24 | 85 | |
| 1-20 | 65 | |
| SCEPTER MOVE | 1-24 | 15 (Animate more towards the right i.e. away from Tom) |
| 1-20 | 5 ( For animating in the direction towards Tom) | |
| 1-18 | 8( For animating in the direction towards Tom) |
However please note that these are examples to provide an idea of the different range of motions used and the number of frames over which the function takes place. These range of motion are recommended but future teams can explore further more different range of motion and different speeds as long as they refer to the range of motion test mentioned above and the animations are smoother. The overall range of motion for different functions based on the direction in which function is taking place for animating in Maya is mentioned below:
MOUTH FUNCTION : From 0 to 40 degrees.
HEAD TILT FUNCTION: From -80 to 80 degrees.
HEAD TURN FUNCTION: From -90 to 90 degrees.
TORSO FORE BEND: From -55 to -85 degrees
SCEPTER MOVE: From -10 degrees to 15 degrees.